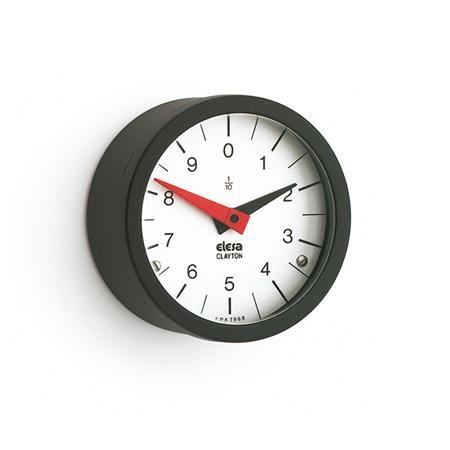
EN 000.8 Position Indicators Plastic, Gravity Drive with Analog Display

Photo

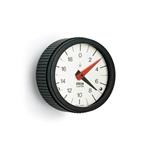
EN 000.8 Plastic Position Indicators, Gravity Drive with Analog Display Type: R - Numbers increasing clockwise
ELESA original design
code: GA11 / GA12
Type: R - Numbers increasing clockwise
EN 000.8 Plastic Position Indicators, Gravity Drive with Analog Display Type: R - Numbers increasing clockwise EN 000.8 Plastic Position Indicators, Gravity Drive with Analog Display Type: L - Numbers increasing counter-clockwise

Product description

Information

Position indicators EN 000.8 have been designed for installation in various types of operating elements.

Housing, and all internal components are an one-piece, ultrasonically welded assembly. They are spray waterproof and corrosion proof (Protection class IP 67).

The gravity drive is mounted on ball bearings to give the most accurate reading, usable up to a shaft inclination angle of 60°.

The reduction gear ratio in the table shows the number of revolutions that are required by the long red pointer to make the small black pointer complete one revolution.

Specification

Housing
Plastic, Polyamide (PA)
Glass fiber reinforced
Black, matte finish


Sight glass
Plastic, Polyamide (PA)
Transparent
Shock and aging resistant


Housing / sight glass
Temperature resistant up to 212 °F (100 °C)
Oil and solvent proof (not suitable for alcohol)


Pointer arms
Plastic
Long pointer arm: red
Short pointer arm: black


Scale
Aluminum
Matte anodized finish
Black graduation lines and numbers


Gravity drive on ball bearings


Protection Class IP 67


RoHS

On request

Special scales
Paraffin oil as a damping media
Technical drawing

3D
Hide technical drawing
EN 000.8 Plastic Position Indicators, Gravity Drive with Analog Display sketch

Part Options / Table

Type

RNumbers increasing clockwise
LNumbers increasing counter-clockwise
Show / Hide columns

Metric

Dimensions in: Inch (change to Metric)
d1Reduction
counting gear
d2d3l1l2
1.652:110:120:140:172:11.961.901.180.91
1.654:112:124:148:1100:11.961.901.180.91
1.656:115:130:150:1120:11.961.901.180.91
1.658:116:136:160:1-1.961.901.180.91
2.362:110:120:140:172:12.702.641.260.98
2.364:112:124:148:1100:12.702.641.260.98
2.366:115:130:150:1120:12.702.641.260.98
2.368:116:136:160:1150:12.702.641.260.98

Build & Price

3D Product Configurator
Outside diameter d1
Reduction
Type


Function

Fixed firmly to the housing or the operating element, the pointer shaft with the longer red pointer is mounted at the center of the position indicator. This pointer therefore shows the revolution of the spindle at a ratio of 1 to 1, at the same time turning in the same direction as the spindle. The pendulum is positioned freely on the same pointer shaft, with the pendulum not turning in sync but always held in the same position owing to its force of gravity.
The scale and the gear wheels required for the desired reduction ratio of the second pointer are mounted on this pendulum. The rotary motion of the operating element is now transferred to the second, shorter pointer via a gear wheel fixed to the pointer shaft and via the reduction gearing at the fixed pendulum. Any position (rotary position) of the spindle can now be read with accuracy on the scale.

Use

The outstanding feature of pendulum-type position indicators is that the measuring system is fully integrated in the operating element. During installation, they require no further measures on the machine side.
In principle, these position indicators have been designed solely for attachment to horizontal spindles, but the high precision of the mechanical measuremen tsystem (the gravity drive is mounted on ball bearings) and the extremely lowcenter of gravity allow these to be used also for spindles inclined
by as muchas 60°.

b89e86fe-92bc-4bde-b597-3dd04b89345a

Selecting the Reduction

While the longer red pointer shows the rotary motion of the spindle of a ratio of 1 to 1, the shorter black pointer makes only a fraction of the rotary motion defined by the reduction ratio.
The reduction ratio is selected depending on the maximum number of spindle revolutions over the entire range of adjustment. The preferred selection is the standard reduction ratio which is the same as or, if possible, slightly larger than the maximum number of revolutions.

Example:

Spindle adjustment range: 11 revolutions

Selected reduction ratio: 12 to 1

This selection gives virtually the whole scale range for the position indication.

Scale

The standard scales have divisions (number of graduation marks) matching the reduction ratio.
The numerical sequence also matches the reduction ratio depending on use, i.e. right turn (clockwise) or left turn (counter-clockwise).
If required and using a separately arranged table, the measured value corresponding the application in hand can be assigned to each scale number.
Special scales on request

93ef7fcb-64c3-4aa0-beed-c3bf4a42a6dc

Selected Part

Total US Dollars (net)
$63.75
In Stock: 7
In Stock
Please note our quantity discounts (US Dollars).
MinMaxPrice
16$63.75
799$61.43
100249$57.96
≥ 250$52.16
Prop 65: Not compliant
WARNING:
Cancer and Reproductive Harm - www.P65Warnings.ca.gov
RoHS: Compliant
This article is RoHS-compliant in application of Annex III., which means it complies with EU Directive 2011/65/EU, including extension (2015/863/EU), for restricting the use of certain hazardous substances in electrical and electronic devices. The Directive regulates the use of hazardous substances in devices and components. The implementation in national law is summarily described with RoHS(Restriction of (the use of certain) hazardous substances)).
Weight: 0.235 lbs
If weight is not listed, please contact our Sales Department for additional information regarding weight.
Phone: 800-877-8351
All Prices are in US Dollars. Taxes Not Included.

CAD Download

Other Data Formats

Email CAD File

To receive an email with a CAD download without creating an account, please enter your e-mail address. Max of 3 CAD files per day unless you create an account.

Please enter the code above.

CAD Download Tutorial About CAD Downloads
Save as Favorites

Please enter the code above.

Need Help?

Our service team is available from Monday to Friday between 7:30 AM and 5:00 PM Central Time: 800-877-8351

Special Requests | Contact our sales team

EN 000.8-42-2-REN 000.8-42-2-LEN 000.8-42-10-REN 000.8-42-10-LEN 000.8-42-20-REN 000.8-42-20-LEN 000.8-42-40-REN 000.8-42-40-LEN 000.8-42-72-REN 000.8-42-72-LEN 000.8-42-4-REN 000.8-42-4-LEN 000.8-42-12-REN 000.8-42-12-LEN 000.8-42-24-REN 000.8-42-24-LEN 000.8-42-48-REN 000.8-42-48-LEN 000.8-42-100-REN 000.8-42-100-LEN 000.8-42-6-REN 000.8-42-6-LEN 000.8-42-15-REN 000.8-42-15-LEN 000.8-42-30-REN 000.8-42-30-LEN 000.8-42-50-REN 000.8-42-50-LEN 000.8-42-120-REN 000.8-42-120-LEN 000.8-42-8-REN 000.8-42-8-LEN 000.8-42-16-REN 000.8-42-16-LEN 000.8-42-36-REN 000.8-42-36-LEN 000.8-42-60-REN 000.8-42-60-LEN 000.8-60-2-REN 000.8-60-2-LEN 000.8-60-10-REN 000.8-60-10-LEN 000.8-60-20-REN 000.8-60-20-LEN 000.8-60-40-REN 000.8-60-40-LEN 000.8-60-72-REN 000.8-60-72-LEN 000.8-60-4-REN 000.8-60-4-LEN 000.8-60-12-REN 000.8-60-12-LEN 000.8-60-24-REN 000.8-60-24-LEN 000.8-60-48-REN 000.8-60-48-LEN 000.8-60-100-REN 000.8-60-100-LEN 000.8-60-6-REN 000.8-60-6-LEN 000.8-60-15-REN 000.8-60-15-LEN 000.8-60-30-REN 000.8-60-30-LEN 000.8-60-50-REN 000.8-60-50-LEN 000.8-60-120-REN 000.8-60-120-LEN 000.8-60-8-REN 000.8-60-8-LEN 000.8-60-16-REN 000.8-60-16-LEN 000.8-60-36-REN 000.8-60-36-LEN 000.8-60-60-REN 000.8-60-60-LEN 000.8-60-150-REN 000.8-60-150-L

This could also be interesting...

Your Contact

You are looking for a Winco partner near you? Please select the country.

JW Winco Services

Our service team is available from Monday to Friday between 7:30 AM and 5:00 PM Central Time

Request Callback
An error has occurred!
We have received your callback request and will contact you soon.